OpenXT Migration to Xen Server Windows PV Drivers
OpenXT Windows in-guest PV Drivers
Preface
In an attempt to reduce duplication of effort and source code maintenance, the Windows in-guest paravirtualized drivers used with OpenXT (http://openxt.org) will be replaced with those used by the XenServer distribution (http://xenbits.xen.org/gitweb). Along with a reduction of effort, the XenServer drivers have been in existence, and being tested, for many years. They have also been certified by the Microsoft driver signing program (WHQL). Leveraging these ideas will create a much more reliable user experience when using Windows guests with OpenXT.
Scope
This document will cover the following details:
- create a build system
- setup a development environment
- access source code
- how to create and apply patches
- integrate custom OpenXT Windows PV drivers to be included in the final installer
- perform builds
These details will be described from the automated build system perspective, as well as from the developer’s. Explanations of what PV drivers are, what Xen is, how to use GIt, how to manage Jenkins CI build systems or general coding practices will not be included here. It is assumed the reader is familiar with all of the above. If not, stop now and go read up…
Source Code Repository Organization
The following repositories currently exist on Github;
There are the following XenServer repos: one repo per PV driver:
- win-xenbus
- win-xenvbd
- win-xeniface
- win-installer
- win-xennet
- win-xenvif
- win-xenvss
There is a single OpenXT repo that includes all OpenXT drivers and components:
- oxt-windows
There will be a number of patch queue repos hosted on Github. Currently, there is only one for win-installer, but there will be more in the future (e.g., to allow for virtual USB devices to be enumerated by XenBus.)
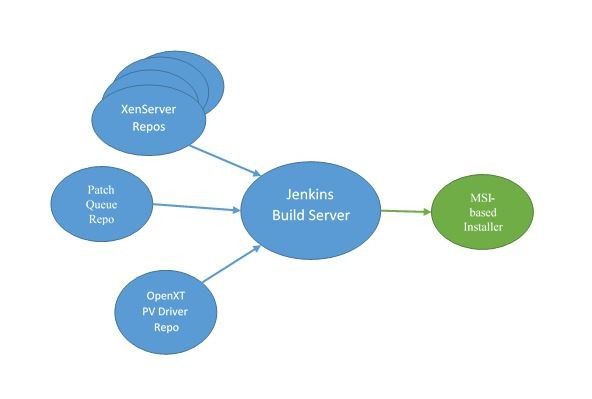
Above is a simple depiction of the organization of the source code repositories, build machine and resulting MSI installer to add the PV drivers to a Windows guest.
The central point, the Jenkins Continuous Integration server is what brings all of the components together, builds them and creates the installer. Jenkins will poll the various repositories looking for any changes and launch a build when needed.
The ‘Patch Queue Repo’ balloon represents any repos that include patches required to the XenServer drivers to allow them to work within the OpenXT environment. The Jenkins server will, after fetching the sources, apply the patches prior to building the XenServer PV drivers.
Windows Installer Build Environment
As shown above, there are multiple Git based source code repositories that make up the final installer. The XenServer repos are based on one repo per driver (e.g., xenbus, xenvbd, xeniface, xenvif, xennet) (https://github.com/xenserver/...) and one for win-installer. The OpenXT PV drivers are all included in a single Github repository (https://github.com/meisners/oxt-windows).
XenServer PV Driver Patching
Patch Queues
As downstream source code changes are created, these changes should be captured as Git formatted patches. Prior to committing a patch, it should be sent to the maintainer(s) of the patch queue repository for approval.
Within the developer’s environment, Git Guilt is to be used to maintain patches. The server environment uses Git Quilt to apply the patches prior to building.
The flow should be something like:
- Clone a XenServer repository
- Clone the related patch queue repository from GitHub into the .git/patches folder:
cd win-installergit clone https://github.com/meisners/win-installer-pq .git/patches
- Make changes to a module (verified with local builds and tests)
- Generate a patch file (this example captures the diff of changes made to build.py):
git diff --cached build.py > .git/patches/build-py_xyz.patch
- Commit the resultant patch file to the patch queue repository (be sure to update the series file; 3rd step below):
cd .git/patchesgit add build-py_xyz.patchls -1 *.patch > seriesgit commit -m “New patch” -sgit push
Note: In the above example of creating a patch, the idea of including the name of the patched module being included in the name of the patch is introduced. This helps to identify patches in the repo. |
Build Server Environment
Build Server Requirements
The build environment will be based on Jenkins CI automated builder. The following tools must be installed:
- Microsoft Windows Server 64-bit
- Jenkins v1.643
- Python v3.5.1 64-bit
- Visual Studio Premium 2012 v11.0.50727.26
- Visual Studio 2012 Update 4
- Windows Driver Framework Package v2.0.3620.0
- Windows Driver Kit v8.59.29757.0
- WiX Toolset v3.8.1128.0
- Cygwin 2.4.1 x64
- Git for Windows v2.6.4.0 64-bit
- NodeJS v4.2.6 64-bit ß MAY NOT BE NEEDED ON THE SERVER
The following Jenkins plugins will also be included:
- Cygpath
- Cygwin Process Killer
- ThinBackup
- Git Plugin
- Git Changelog
- All Changes
- Status Monitor
- Build Monitor View
Build Environment Configuration
When building the installer, the build scripts need to know how to access all of the other binaries that were built as a result of the other projects (such as the XenServer PV drivers). The way the script is written, it expects all 32 and 64-bit output folders to be off a single directory structure, so the easiest way is to create a new folder (such as C:\Builds) and create hard links to all the necessary output folders. As an example:
cd /d C:\mkdir Buildscd Buildsmklink /D xenbus C:\source\win-xenbus\xenbusmklink /D xenvss C:\source\win-xenvss\xenvssmklink /D xenvbd C:\source\win-xenvbd\xenvbdmklink /D xenvif C:\source\win-xenvif\xenvifmklink /D xennet C:\source\win-xennet\xennetmklink /D xeniface C:\source\win-xeniface\xenifacemklink /D xenguestagent C:\source\win-xenguestagent\xenguestagentmklink /D xenprep C:\source\win-installer\xenprepmklink /D setup C:\source\win-installer\setupmklink /D Libraries C:\source\win-installer\Librariesmklink /D installwizard C:\source\win-installer\installwizardmklink /D InstallAgent C:\source\win-installer\InstallAgentmklink /D BrandSupport C:\source\win-installer\BrandSupportmklink /D Uninstall C:\source\win-installer\Uninstallmklink /D xenaud C:\source\oxt-windows\Build\Release\xenaudmklink /D xeninp C:\source\oxt-windows\Build\Release\xeninpmklink /D xenvesado C:\source\oxt-windows\Build\Release\xenvesado
Jenkins Continuous Integration Environment
Within Jenkins Configuration, set the following environment variables:
CYGPATH=/usr/local/bin:/usr/bin:/:/cygdrive/c/Program Files/Python35/Scripts:/cygdrive/c/Program Files/Python35:/cygdrive/c/Windows/system32:/cygdrive/c/Windows:/cygdrive/c/Windows/System32/Wbem:/cygdrive/c/Windows/System32/WindowsPowerShell/v1.0:/cygdrive/c/Program Files/Microsoft SQL Server/110/Tools/Binn:/cygdrive/c/Program Files/Git/cmd:/cygdrive/c/Program Files/nodejs:/cygdrive/c/Users/oxtuser/AppData/Roaming/npm
Note: The CYGPATH setting is copied from the PATH setting when a Cygwin terminal is brought up |
CYGWIN=nodosfilewarning
KIT=C:\Program Files (x86)\Windows Kits\8.0
SYMBOL_SERVER=C:\Builds\Symbols
VS=C:\Program Files (x86)\Microsoft Visual Studio 11.0
WIX=C:\Program Files (x86)\Wix Toolset v3.8\
In Jenkins, set Shell Executable:
Shell Executable: C:\cygwin64\bin\bash.exe
Performing Builds
Developer Environment
Developer Environment Requirements
The developer environment will be based on a Microsoft Windows desktop operating system. Additional products/tools that must be installed include:
- Microsoft Windows 64-bit desktop OS (such as Windows 10 x64)
- Need appropriate license (such as MSDN)
- Python 64-bit V3.5.1
- https://www.python.org/ftp/python/3.5.1/python-3.5.1-amd64.exeVisual Studio Premium 2012 v11.0.50727.26Need proper license (such as MSDN)
- Visual Studio 2012 Update 4
- Windows Driver Framework Package v2.0.3620.0
- Windows Driver Kit v8.59.29757.0
- WiX Toolset v3.8.1128.0
- Git 64-bit for Windows V2.6.2 or later
The following environment variables must be set (either in the System Properties, Advanced System Settings, Environment Variables or via a batch script file):
KIT=C:\Program Files (x86)\Windows Kits\8.0
SYMBOL_SERVER=C:\Builds\Symbols
VS=C:\Program Files (x86)\Microsoft Visual Studio 11.0
WIX=C:\Program Files (x86)\Wix Toolset v3.8\
The following are required for Git Guilt:
- NodeJS (http://nodejs.org/)
- I used the LTS (Mature and Dependable) version v4.3.0 at the time of this writing
- And, yes, Git Guilt requires JavaScript support for Windows
- Git Guilt (https://bitbucket.org/tpettersen/git-guilt)
- npm is- not required as mentioned on the git-guilt site, so that can be skipped
To install Guilt (Copied from the git-guilt site):
- Install Git, Node.js (tested against v0.10.3) and npm
- Run
npm
install -g git-guilt
. You may needsudo. - Run
git-guilt
HEAD~1 HEAD
in any git repository to see the blame delta for the last commit.
The screenshot below shows the install and a test run within a Mingw terminal window:
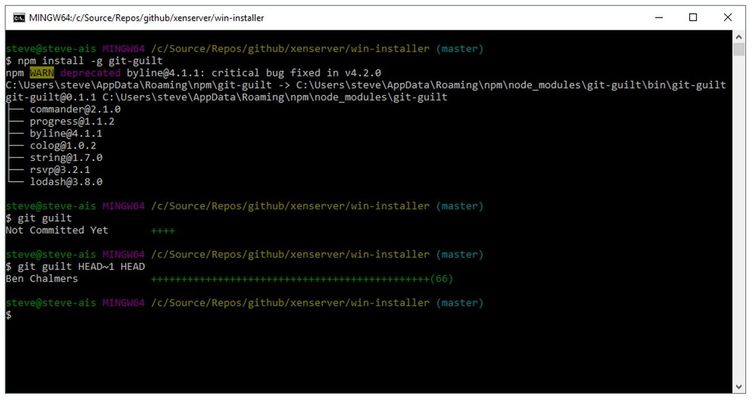
Notice the Git Guilt command was run within an existing cloned repo (Win-Installer).
At this point, each of the individual XenServer projects should be able to be built. Start a Command Prompt window and issue the following command:
build.py free nosdv
The ‘nosdv’ will keep the Microsoft Static Driver Verifier from being run. This is a very good tool, but takes a long time to run. So while developing your patches, you can skip running it. If wanted, just leave off the ‘nosdv’ and it will be run.
Prior to being able to build the installer, the section on creating the linked directories found elsewhere in this document must be performed. A single folder must be created in the directory structure where the win-installer build script can find all of the binaries necessary to build the installer.
Performing Local Builds
Now the installer can be built as follows:
build.py --local C:\Builds
Repositories & Patch Queues
Each XenServer software component is a separate GitHub repository. For example, each of the PV drivers are individual repositories. All XenServer source repositories are located on GitHub:
Within the above site, all other projects can be located. If you search for a particular driver (e.g., xenvbd) you will be brought directly to the repository.
The patch queues repos are stored in different organization names (i.e., not under the XenServer GitHub organization). These repositories are to keep patches needed to build the XenServer installation kit suited to OpenXT’s needs. Any patches created should be shared with the community (the XenServer team especially) to give them the opportunity to integrate them into their code. If they do, that’s a win since it will keep the deviation from master as limited as possible, as well as giving the author of the patch kudos! And if it’s an improvement/bug fix, it makes XenServer drivers even better.
Build Server System Maintenance
Backups
Every weekday at 12:00, ThinBackup is run. This creates a local backup of all job configs and Jenkins config. There is a Jenkins job that runs every weekday at 13:00 that does an rsync of the local backup area to the Synology Rackstation (location is /volume1/XenServer). To allow this to work, password-less access was used and a public key was saved to /root/.ssh on the Rackstation. The private key is stored on the Jenkins server in /home/SYSTEM/.ssh in a Cygwin terminal. This location maps to C:\cygwin64\home\SYSTEM\.ssh.
I could not get a non-root account to work rsync’ing to the Synology, this is why root was used as the remote user.
Troubleshooting
Git guilt claims an ‘Unsupported version of Git’
[Cygwin guilt, so server only] The script that implements guilt must be modified. This is a known problem, but the fastest way to fix it is to modify /usr/bin/guilt:
#
# Git version check
#
gitver=`git --version | cut -d' ' -f3 | sed -e 's/^debian\.//'`
case "$gitver" in
1.5.*) ;; # git config
1.6.*) ;; # git config
1.7.*) ;; # git config
1.8.*) ;; # git config
1.9.*) ;; # git config
2.7.*) ;; # git config
*) die "Unsupported version of git ($gitver)" ;;
esac
The case statement must have “2.7.*” added as a valid choice.
Invalid command reported:
[Cygwin guilt, so server only] The guilt script is using an improper parameter notation for a find command. Locate and modify the following lines:
guilt_commands(){find "`dirname $0`/../lib/guilt" -maxdepth 1 -name "guilt-*" -type f -perm /+111 2> /dev/null | sed -e "s/.*\\/`basename $0`-//"find "`dirname $0`" -maxdepth 1 -name "guilt-*" -type f -perm /+111 | sed -e "s/.*\\/`basename $0`-//"}
The change is the ‘-perm /+111’ parameter. The original script has ‘-perm +111’.